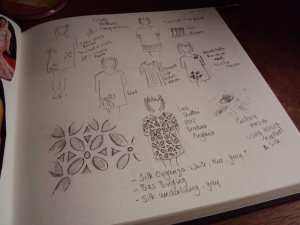
The page in my ‘design journal’ where I brainstormed Laurel dress designs shows that the eyelet design was really the only one I contemplated seriously out of all the other ideas I came up with.
Yep, there it is, all big and with loads of detail at the bottom of the page there. What other dress designs…?
For about a week though, I wasn’t sure whether it was feasible. I’d already decided that silk organza would be just the thing for the eyelet laden over-dress, but my ideas for actually creating an eyelet were hazy at best. Looking at my source photos the edge of the eyelets are not embroidered as a broderie anglaise would be, and, quite frankly, I’d ruled a zig-zag edging out of my plans. Have you seen how much organza frays? To avoid a hairy-edged mess, I’d need to pack those zigs in. And I’d already experienced zig-zagging at 0.1mm length stitches on my machine when trying to sew neat button holes; hours later…
So I went to work on the only idea I’d had so far which was to use bias binding round the edges. I pulled out some scraps of organza, some white ‘cotton’ and got to work on a test sample.
And that there test sample almost made me give up for good.
After a drink (possibly alcoholic) I mused over my mistaken physics. Bias binding would never lie flat, because the circumference of the outer circle edge would be the same as that of the inner, but a ‘facing’ would. That was when I remembered some wool jersey.
The advantage of the wool jersey is that it doesn’t fray, therefore I didn’t have to finish the edges, and I could cut quite close in to the stitching on both the inner and outer edges of the eyelets. On both edges I turned the stitch length down to its lowest setting (1). When cutting out the central hole I got in as close as I felt comfortable, cutting round the shape, and then cut very small nicks into the point of the eyelet and around the curves. I then pulled the facing through and steamed the life out of it to give me a good flat edge. In the picture of the back you can see the that the organza isn’t quite pulling round to the edge, and I need to get better at a cleaner point, but this was just the first one! I originally hand stitched the outer edge, turning it under slightly, but it didn’t look very neat, and was time consuming, so I tried machine stitching and decided it looked better. (Which is why you can see that strange line in the photo above, that was my original pressing crease when the edge was turned under.)
Now I knew it could be done all that remained was to brace myself for rather a lot of sewing.


Hi Meggameuf
Congratulations on your Laurel entry and prize! Your design is amazing. You’ve put so much care and patience into this dress and it’s really helpful to see your method. Good luck with new projects!
Marianna
Thanks Marianna! I’m glad you liked the dress and my methodology post. Thanks for reading.