On Eastney Beach

The beaches that surround my new home are mainly shingle, made up of millions of shells and pebbles. Many of the pebbles are flint and I’ve been having fun collecting a myriad colours.

A selection from the beach

A selection from the beach

Mostly they’ve been piling up around the house, but this gem in my latest haul inspired me to draw this.

The front panel reminds me a bit of the Polly Top from By Hand London. http://byhandlondon.com/products/polly-top

Advertisement

Is it a skirt/top? Is it a dress? No! It’s Super Versatile

I was hoping to have finished Vogue 1247 by now. I am in the home stretch, but stretch is the optimal word. Last minute impatience had me rushing to finish the sleeve cuffs and hem, this has led to some wonky and ripply edges. I’m taking a break to return when Little Miss Impatient is asleep (er, that’s my brain, not an actual child or anything…).

In the mean-time, I’ve been dreaming of the next items in my wardrobe challenge. Which is probably part of the problem described above, so I know I shouldn’t, but, well, I can’t help it…

From somewhere I seem to have become obsessed with tops and skirts masquerading as dresses. I first became aware of this phenomenon from vintage patterns, where things I would call a two-piece seem to be called a dress.

Picture sources @ Melanie on Pinterest

(And, conversely, according to Claire Shaeffer, Chanel would oft-times sew a shell top to a skirt in order to make the skirt hang better. This wasn’t meant to be seen as a dress, so seemingly was still called a skirt. Who knew you could play so fast and loose with the terminology?)

Then there came the much-made peplum combo from Burda Aug 2012.

Source: burdastyle.com via Melanie on Pinterest

You would think this is dress. Fooled again! It’s a skirt/top. I wanted to make that skirt/top so badly. I think it was about that time that a small neuron stuck up its dendrite and suggested ever so quietly that, even better, if I made two, I could mix and match them, the skirt from one with the top from the other. Might I still do that? Well, maybe… there’s a piece of black hound’s tooth that’s got peplum written all over it. But the turqoise linen is getting made up into a two piece peplum. right. now.

So to meet the requirements of the challenge without looking like a great big peplum weirdo, my plan is to take one of the other fabrics and make both a skirt, which can also be matched with the peplum, and a second top of a different design. That way all four items will co-ordinate with each other, but I still get to indulge in the skirt/top masquerade gimmick, and I’ll have two different looks. I know!

However, (and it’s always more complicated when my brain gets involved), back to the actual Burda pattern, I decided, after reading Fehr Trade‘s review, that I would want to swap the bodice for something else. Various plans ensued: redraft the supplied bodice by manipulating the waist dart into a princess seam; use the top half of the wiggle-dress from Gertie’s Book for Better Sewing; oh, wait, what’s that weird non-pattern at the start of Pattern Magic 2?

Pattern Magic: 'Basic Lesson'

Pattern Magic: ‘Basic Lesson’

So, without further ado here are my initial designs for the turquoise linen/silk blend and African wax fabrics.

Mix and match

Mix and match

I’ve tried to find an on-line example of someone making this, but it seems that most people did what I did initially and skipped over it. The only reference I can find to making this top is in a post, again by Fehr Trade, describing a course she took at Morley College. They’re doing another one this year, look.

So you’ll just have to look at my grainy photo and the shaping lines in my design illustration, until I show my pattern.

This also ticks off one of my challenge aims: using some instructions from the Pattern Magic books.

I’m getting excited about sewing my peplum a year after the trend hit, although, there are some who are, apparently, ‘over’ it already! I don’t care!

Plan A

Final selection (a couple more might have sneaked in...)

Final selection (a couple more might have sneaked in…)

When pulling fabric from my stash there were a fair few that I’d bought with a purpose in mind (rather than grabbing them in a frenzy of colour, like a magpie, which is my other modus operandi), therefore in my choice of palette, I already had the bones of a plan. As mentioned in a previous post, one reason I picked this colour-way was to use the turquoise/orange/brown African wax-print I bought last summer. This was at the height of a micro ‘ethnic’ trend and I wanted to make a pencil skirt, but life was getting in the way and last year’s summer wasn’t exactly tropical…

As it stands, here is it is:

Bottoms:

1) Colette Clovers in indigo stretch cord; I made a muslin for these back in October last year, then got hung up on the fit and never progressed

2) A simple self-drafted skirt in the turquoise linen and,

3) one in the African wax fabric.

Tops:

1&2) I’ve been obsessed with a number of versions of Vogue V1247 that have been knocking around other blogs, mainly this one (the first I saw).

But I’m not sure if it will suit me (the tent effect), we will see; regardless, I’m planning two of these tops, a wearable muslin with a blue silk  and the ‘real’ one out of the patterned chiffon/gauze;

3) A peplum top with the turquoise linen;

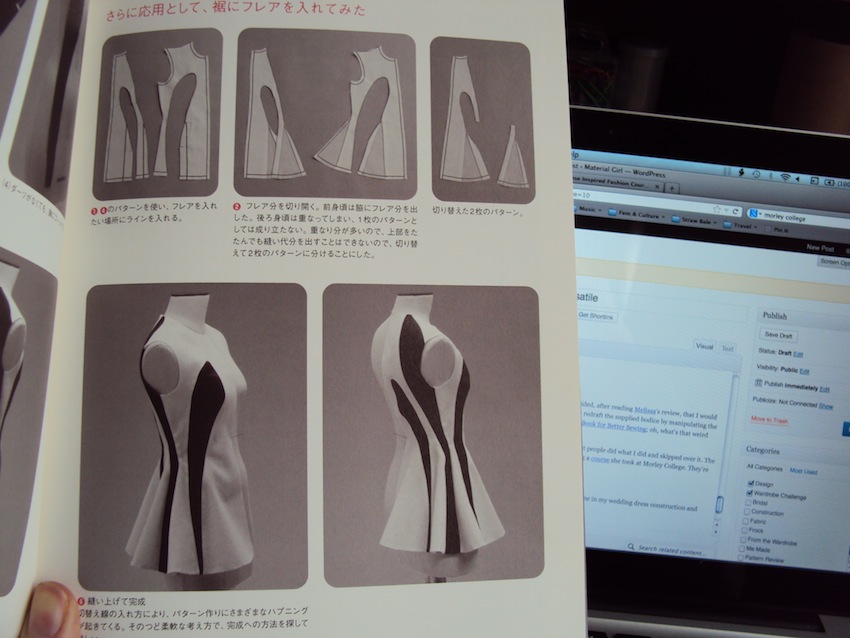
4) One shirt from the pattern magic books with brown cotton;

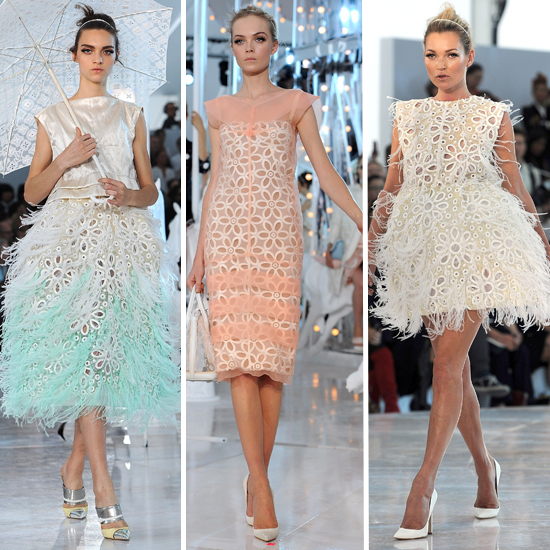
5) A top, as yet un-designed from the white furry lace fabric;

6) One from the African wax fabric;

7) AND, if I’ve the will after all of these, one from a small piece of brown double gauze (likely to be something like a Colette Sorbetto).

First up, the Clovers and a blue silk V1247.

Uber-Eyelet Design ‘process’: how the eyelets were born

The page in my ‘design journal’ where I brainstormed Laurel dress designs shows that the eyelet design was really the only one I contemplated seriously out of all the other ideas I came up with.

Laurel design ideas

Laurel design ideas (not sure what ‘bias bingling’ is…)

Yep, there it is, all big and with loads of detail at the bottom of the page there. What other dress designs…?

For about a week though, I wasn’t sure whether it was feasible. I’d already decided that silk organza would be just the thing for the eyelet laden over-dress, but my ideas for actually creating an eyelet were hazy at best. Looking at my source photos the edge of the eyelets are not embroidered as a broderie anglaise would be, and, quite frankly, I’d ruled a zig-zag edging out of my plans. Have you seen how much organza frays? To avoid a hairy-edged mess, I’d need to pack those zigs in. And I’d already experienced zig-zagging at 0.1mm length stitches on my machine when trying to sew neat button holes; hours later…

So I went to work on the only idea I’d had so far which was to use bias binding round the edges. I pulled out some scraps of organza, some white ‘cotton’ and got to work on a test sample.

And that there test sample almost made me give up for good.

After a drink (possibly alcoholic) I mused over my mistaken physics. Bias binding would never lie flat, because the circumference  of the outer circle edge would be the same as that of the inner, but a ‘facing’ would. That was when I remembered some wool jersey.

The advantage of the wool jersey is that it doesn’t fray, therefore I didn’t have to finish the edges, and I could cut quite close in to the stitching on both the inner and outer edges of the eyelets. On both edges I turned the stitch length down to its lowest setting (1). When cutting out the central hole I got in as close as I felt comfortable, cutting round the shape, and then cut very small nicks into the point of the eyelet and around the curves. I then pulled the facing through and steamed the life out of it to give me a good flat edge. In the picture of the back you can see the that the organza isn’t quite pulling round to the edge, and I need to get better at a cleaner point, but this was just the first one! I originally hand stitched the outer edge, turning it under slightly, but it didn’t look very neat, and was time consuming, so I tried machine stitching and decided it looked better. (Which is why you can see that strange line in the photo above, that was my original pressing crease when the edge was turned under.)

Now I knew it could be done all that remained was to brace myself for rather a lot of sewing.

Hullo world (or, at least, the part interested in sewing)

Louis, Louis (er, and Louis) (from 2noblecrows)

Louis, Louis (er, and Louis) (from 2noblecrows)

The Louis Vuitton eyelet fabric from spring 2012 registered immediately on my bride radar (more on what tickles that in later posts). With the frustration of knowing I would never be able to find that fabric (unless my fabric-stall man outside Sainsbury’s happened to find it lurking in his magical warehouse), I parked it as airy, frothy inspiration. That was until Colette Patterns announced a competition to coincide with the launch of their new pattern, Laurel.

“Yes!” I thought “it’s now or never. Can I possibly recreate something that looks anything like Louis’s eyelets?” The answer, after several weeks of production-line sewing is, probably not! But, then again, does that matter?